Friday, August 16, 2013

Fourth and Goal

Football pre-season is upon us my lovelies and that means fall is on the way.  When I watch football I am constantly snacking and I don't necessarily like eating all of the typical snack foods.  Today in the kitchen we will be poaching  some boneless skinless chicken breasts and turning them into  4 tasty chicken recipes for two for your snacking pleasure.  So let's head into the kitchen and score with four quarters of  awesome chicken yum!

This is all make ahead stuff so I usually make the chicken and other bits and pieces when I have my Saturday afternoon free.

First we are going to start by poaching 4 large boneless skinless chicken breasts.  We want to season our breasts well since we are poaching the meat, so let's start with my favorite poultry seasoning:
2 teaspoons dried parsley
1 teaspoon rubbed sage
1/2 teaspoon dried rosemary, crushed
1/2 teaspoon dried marjoram
2 teaspoon salt
1 teaspoon ground black pepper
1/2 teaspoon onion powder
1/2 teaspoon garlic powder
Mix all together in a ziplock bag. 

Place 4 large boneless skinless chicken breasts in a pot that's just about large enough to fit them in one layer Divide up our poultry seasoning over the tops of the chicken. 
Add water so that it completely covers the chicken a half inch to an inch.
After bringing the liquid to a boil, reduce heat to a bare simmer so that only an occasional bubble breaks the surface. At this point, partly cover the pot, cook for about 10 minutes, then turn off the heat, leaving the chicken to finish cooking in the hot water for 10-15 more minutes.
Remove chicken, and reserve liquid for our 1st quarter dish.

Now let go through our play book and plan our strategy:

1st Quarter Cream of Chicken and Rice Soup
Take all of our leftover seasoned juice from poaching our chicken and shred in 1 chicken breast, 2 cups of milk and 2 tablespoons of Sour Cream.  Stir well until sour cream is mixed in then place in a covered bowl and refrigerate until ready to use.   You will also need 1 cup of cooked rice (I usually have some rice around in my fridge since it is one of my favorite side dishes but if you don't have any sitting around you can just cook some and put that in the fridge also)
When ready to serve: Microwave, uncovered, on HIGH 5 min. until hot, stirring halfway through cooking.  Place 1/2 cup of rice in 2 smaller bowls and serve soup over rice stir well to heat rice. (Note: you can also re-heat the rice but usually the soup does a fine job of this when added).

2nd Quarter Chicken Salad Snacks
I have an awesome recipe for chicken salad that I discovered years ago using craisins which makes a slightly sweet and savory chicken salad that goes great on crackers (I love to use Ritz Crackers for this).  Shred 1 chicken breast and add 1 cup of real mayonnaise, 1/2 cup of craisins, 1/4 cup finely chopped red onions, 1 stalk of celery sliced thin, 1/4 teaspoon fresh cracked black pepper.  Mix all well, cover bowl and refrigerate.
Serve by placing about a teaspoon each on Ritz Crackers
 

3rd Quarter BBQ Chicken  Super Sandwich
Shred 1 Chicken breast in 3/4 cup of your favorite bbq sauce and add some chopped red onion (about 1/4 cup I like lots so I add a little more)  4 slices of precooked bacon chopped.  Place all in a microwavable covered bowl and refrigerate.  You will also need a couple of slices of Cheddar Cheese and a couple of Kaiser Rolls.
When ready to serve: Microwave, uncovered, on HIGH 4 min. or until hot, stirring halfway through cooking.  Place on kaiser rolls with a slice of cheddar cheese.

4th quarter Frank's® Redhot® Buffalo Chicken Dip  
4 oz.(1/2  pkg.) cream cheese, softened
1/4 cup ranch salad dressing
1/4 cup FRANK'S® REDHOT® Original Cayenne Pepper Sauce
1/4 cup shredded mozzarella
1 shredded chicken breast
In microwave-safe dish place cream cheese and stir until smooth.
MIX in salad dressing, Frank's RedHot Sauce and cheese. Stir in chicken.  Cover Bowl and place in refrigerator.  (I like to serve this on Ritz Crackers also)
When ready to serve: Microwave, uncovered, on HIGH 5 min. or until hot, stirring halfway through cooking.. Serve on Ritz Crackers or any other chips you prefer..this is also really yummy on celery stalks.

So there we are my lovelies, the perfect game plan for watching your favorite team!  
Touchdown!

Wednesday, August 14, 2013

I've been mugged

No not really, but today in the kitchen we are going to explore four yummy, make in a mug recipes that you can cook in the microwave.   I have to admit that I am not really fond of cooking in the microwave, but today I found some comfort food recipes that may just change my opinion.

The thing about comfort food is that when you aren't feeling up to par, comfort food, well, it comforts you.  I recently read an article on why it works check it out here:  Why Comfort Food Works.  So from this article I discovered that fat is the key to comfort; having said this I must now warn you these recipes are not low calorie nor are they necessarily healthy for you, but with the portion control of our little coffee mugs they are not as bad as say consuming that whole pint of Ben & Jerry's Chunky Monkey we might otherwise turn to.  So come along my lovelies let's shuffle into the kitchen with our favorite coffee mugs in hand and seek comfort in some classic comfort food for one.

Potato Soup in a Mug

Ingredients:
1/3 cup instant potato flakes
1/4 cup powdered coffee creamer (plain) 
2 teaspoons parmesan cheese
3/4 teaspoon dried chives
1/2 teaspoon garlic powder
1/4 teaspoon onion powder
1/8 teaspoon salt
1 tablespoon butter 
pepper ( to taste)
1 cup water
Directions:
Mix all dry ingredients in a ziploc bag.
Empty mixture into a microwaveable mug.
Add  water & butter. 
Mix well.
Microwave on high for 1-1/2 - 2 minutes.
Stir. 
Cover with plastic wrap. 
Let stand 3 minutes.
You can also add 1/8 tsp bacon bits and/or some cheddar cheese for a little extra fat.

Mug of Mac & Cheese

1/3 cup pasta
1/2 cup water
1/4 cup milk
1/2 cup shredded cheddar cheese

Combine the pasta and water in a large mug or bowl. 
Microwave on high for two minutes, then stir. A lot of times the water will overflow while it heats up. It is OK if this happens just make sure to keep a towel handy for easy clean up.  
Repeat this for at least 2 to 4 more minutes, stirring at each 2-minute interval. 
The water should absorb completely and the pasta will be cooked through. (If the pasta needs another minute it is okay to add one more teaspoon of water and microwave for another minute)
Remove it from the microwave and stir in the milk and cheese. 
Microwave for another minute. 

Stir thoroughly, let stand for 2 minutes, stir again and enjoy!

Personal taste note:  This recipe was a little too bland for my taste so I also added some dried minced onion, granulated garlic, and salt during the boiling process.  In addition, I added a couple of dashes of Franks Red Hot Sauce before serving.

Meatloaf in a Mug

Ingredients:
1 slice white bread, torn into pieces
2 tablespoons milk
1/2 teaspoon Worcestershire sauce
1/4 lb ground beef
1 green onion, thinly sliced
1/4 teaspoon seasoning salt
1/8 teaspoon ground black pepper

Directions:
Place the torn bread into a small bowl, and pour in the milk and Worcestershire sauce; set aside for a few minutes for the bread to absorb the liquid. Add the ground beef, green onion, seasoned salt, and pepper to the bread; mix well and place into a microwave-safe mug.
Cook in the microwave at 70 percent power until the meatloaf is firm and no longer pink in the center, 4 to 5 1/2 minutes depending on the microwave. 
Remove the meatloaf from the microwave, and allow to stand 2 minutes before serving with a small amount of ketchup on top.

And for some extra comfort I give you 

Dad's M & M's Hot Chocolate

Ingredients:
1/4 cup M&M' ( plain)
1 cup hot milk

Directions:
Place M & M's in a zip lock back and crush with the flat side of a meat tenderizer. (you can also use a food processor to chop but that's just more dirty dishes in my book)
Place M & M's in mug.
Add milk. Microwave 2 - 3 minutes until hot. Mix until smooth.

All in all today's recipes are ok substitutes for the real thing in a pinch, but I did find I would rather have the good old fashioned originals that are baked in the oven or cooked on the stovetop.  So as far as experiments go I would say these were successful enough to pass as comfort food but still not as comforting as mom or grandma making them for you with love!

Until next time in the kitchen my lovelies please remember to perform random acts of kindness whenever and wherever possible!  

Sunday, August 11, 2013

Cleaning out the fridge...Let's make some Chinese food


"Tell me and I'll forget, show me and I may remember, involve me and I'll understand."(Chinese proverb)

Today in the kitchen we are going to have some fun making our own Chinese food.  As many of you know I love to mix and mingle lots of different recipes together to create unique and interesting dishes...earlier this week I spent way too much time on Pinterest looking at different things to do with what I had in my pantry...after perusing for several hours (I never can understand how going to Pinterest and YouTube turns into a several hour excursion)  I came up with today's recipe mash up.  
I try not to let anything go to waste in the kitchen so for today's recipe we are using things from the fridge door, bits and pieces of left over items from other recipes, as well as what's left in the containers hiding out in the fridge.   

Pineapple Teriyaki Marinated Pork

1/3 cup your favorite BBQ Sauce (today I'm using some Apple Whiskey BBQ Sauce I had left over from making BBQ Chicken earlier in the week)
1/3 cup your favorite Teriyaki Sauce/Marinade (I found a little left in the bottle hanging out in the door of my fridge)
Chunk Pineapple drained and any reserved juice (leftover from a pineapple snack) 
1/4 cup EVOO
1 - 2 Cloves finely chopped garlic
2 pounds pork stew meat
1/2 Bag of Stir Fry Veggies *Peppers & Onions* Note: you can find this in the frozen veggie section of your local grocery store.  I always try to keep some on hand for dishes like this or when Peppers don't look so great in the produce department. (leftover from making chinese food last week)
1/4 cup  Green Onion (leftover from making our poppers the other day)
Your Favorite Cooked Rice (leftover Thai Jasmine Rice from making rice cause I have a new rice cooker that I just love to use!)


Directions:
Mix EVOO, Teriyaki sauce and garlic pour over pork in a plastic bag. Seal tightly and let marinate for 20 to 30 minutes. Remove pork from marinade & reserve remaining marinade.

Pan fry pork pieces in a small amount of oil, (make sure to use high heat to reduce the amount of moisture that escapes the meat when cooking)  for 10 - 15 minutes or until meat has a good color and is done to about 155 degrees. Add the Pineapple, Onion & Peppers and cook an additional 5 minutes (if using frozen stir fry mix this may take just a couple of minutes longer) until veggies and pineapple are hot but not really soft.  Let stand 5 minutes.


Meanwhile, in a 1-quart saucepan, mix the remaining marinade, pineapple juice and BBQ Sauce and cook over medium heat until mixture comes to a full boil (2 to 3 minutes). Add marinade mixture over top pork & veggies.


Serve the pork on top of a bed of rice and garnish with the green onion.


And there we go my lovelies...Chinese food from your own kitchen that tastes better than the take out you pick up on the way home...done with the leftovers from the kitchen!

Friday, August 9, 2013

You got your Chinese food in my Mexican food

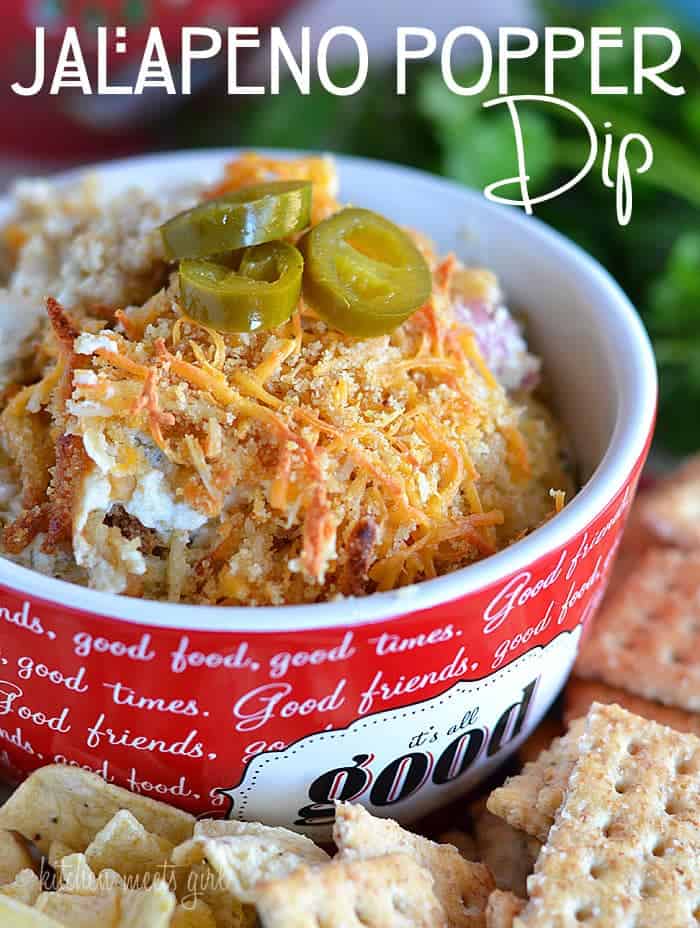
So the other day my friend posted a link to this on her FB page...

Original recipe from kitchenmeetsgirl.com
 I fell in love with the concept of this but I didn't necessarily like the idea of a whole pan of dip cause that can be dangerous around me (I have a tendency to want to try to eat the whole pan if no one is around). 


While at the grocery store I saw won ton wraps and an idea began brewing in my head...what if I take the basic recipe for the jalapeno dip and fuse it with cream cheese rangoons (another one of my snack favorites). This is what I came up with...

Poppin' Hot Rangoons

So come along my lovelies today in the kitchen we are going to do an experiment of the yummy kind.

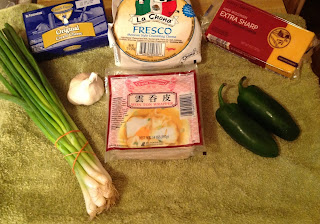
What you need:


2 - 3 pan roasted Jalapenos, seeded, skinned and diced
2 large cloves pan Roasted Garlic minced
1 (8-ounce) package Cream Cheese, softened
1/2 cup Real Mayonnaise
1/2 cup Green Onion 
(Nerd girl in the kitchen note: instead of chopping green onion, use your kitchen scissors and cut them instead... there is less bruising that way)

1 cup shredded Sharp Cheddar Cheese
1 cup crumbled Fresco Cheese (your local Mexican store will have this)

1 tablespoon Frank's Red Hot Sauce

About 15 - 20 Won Ton Skins (you can usually find these in the freezer section of your local grocery store by the oriental cuisine)

What to do:

Pan roast jalapenos and garlic in a small saute pan with a little EVOO, after cooling, remove skin and seeds from peppers and dice then mince the garlic.

Preheat Deep Fryer to 375.

In a medium bowl, combine everything but the wonton skins and mix well.

Place about 1 tablespoon of the cream cheese filling in the middle of a wonton wrapper. Use your finger and run a small amount of water around the outer edges of wrapper and pinch top and side edges.

Place 3 or 4 at a time in deep fryer and fry for 1.5 minutes then flip and continue to fry another 1.5 minutes.  Remove from fryer and drain on paper towels.


So to get the full fusion effect of Chinese and Mexican mingle try serving with some pepper jelly to imitate a sweet & sour sauce with a little Mexican flair.


So there we go a little experimental yummy for your tummy...enjoy!!!

Sunday, August 4, 2013

With a little help from my friends


So it is friendship day and here in the kitchen I thought we would celebrate by making some Amish Friendship Bread to share with your friends

AMISH FRIENDSHIP BREAD

First some need to know notes on making a starter bread:

Do not use any type of metal spoons or bowl for mixing. (Nerd girl note on the science behind this:  the metal messes with the PH balance) 
Do not refrigerate. (this tends to freak people out because they are using milk...never fear you are creating a sour dough so you need to let this sour)
If air gets into the bag, let it out. 
It is normal for the batter to rise, bubble, and ferment

And now on with the noms:

Amish Friendship Bread Starter

1 pkg. active dry yeast
1/4 cup warm water (110 degrees F)
1 cup all-purpose flour
1 cup white sugar
1 cup warm milk (110 degrees F)

In a small bowl, dissolve the yeast in warm water for about 10 minutes. Stir well.In a 2 quart glass or plastic container, combine 1 cup sifted flour and 1 cup sugar. Mix thoroughly or the flour will get lumpy when you add the milk.Slowly stir in the warm milk and dissolved yeast mixture. Pour into a ziplock bag. The mixture will get bubbly. Consider this Day 1 on the cycle, or the day you receive the starter.

For the next 10 days, handle the starter according to the instructions below.

Day 1: Do nothing. This is the date on which you receive the bag. Mash the bag. Make sure the bag is dated!
Day 2: Mash bag
Day 3: Mash bag
Day 4: Mash bag
Day 5: Mash bag
Day 6: Add to the bag 1 C. flour, 1 C. sugar, 1 C. milk. Mash the bag.
Day 7: Mash bag
Day 8: Mash bag
Day 9: Mash bag
Day 10: BAKING DAY! Mix and divide the starter as follows:Pour entire contents of bag into large non-metal bowl and add: 1 cup flour, 1 cup sugar, 1 cup milk.

Measure out 4 separate batches of the starter batter, 1 cup each, into 4 separate Ziplock bags (one gallon size).
Keep one for yourself and give the other 3 to friends along with a copy of this recipe/instructions.
Preheat oven to 325

To the remaining batter in the bowl, add:

3 eggs
1 cup Canola oil
1/2 cup milk
1 cup sugar
2 tsp cinnamon
1/2 tsp vanilla
1 1/2 tsp baking powder
1/2 tsp baking soda
1/2 tsp salt
2 cups flour
1 large box instant vanilla pudding (about 5.9 oz.)

In a separate bowl, mix together

1/2 cup sugar
1 1/2 tsp cinnamon

Grease or butter 2 large glass loaf pans. Dust the greased pans with half the cinnamon/sugar mixture.
Pour batter evenly into the pans and sprinkle the top with remaining sugar mixture.
Bake for 1 hour. Cool until bread loosens from sides of pan and turn out to serving dish.
If bag isn't passed on to a friend on the 10th day, be certain to tell recipient which day the bag is at when given to them. If you keep a starter bag for yourself, you will be baking every 10 days.

OPTIONS: Add 1C. Chopped nuts or raisins, I have even seen some recipes that use other dried fruits so experiment my lovelies and let me know what other wonderful things you find to stir in.  For all my Nutella fans...I have heard rumor that this is an awesome mix in too.  You will have a new batch to experiment with every 10 days so have fun with it my lovelies!!!


Wednesday, July 31, 2013

It's Christmas in July here in the kitchen this week

We're having a triple play in the kitchen today.  Every year my grandmother would make these traditional cookies for Christmas but I happen to think they make awesome summer cookies too.  So today in the kitchen we are going to celebrate Christmas in July with some Kolacky, Thumbprint Cookies and Nut Roll!

The great thing about today's recipes is one dough does it all.  So get your Santa hats on and let's head into the kitchen for some yum!


The Dough:
6 oz. cream cheese
1 cup butter, softened
2 cups all-purpose flour

The Kolacky & Thumb Prints:
1/2 cup preserves(various flavors) (NOTE: I like to use apricot & raspberry but you can also use some additional cream cheese sweetened with honey or sugar or apple butter is tasty in these too...whatever preserves you like will taste great)

The Nut Log:
1/2 pound ground walnuts
1/2 stick margarine softened (Note from the kitchen: yes I know I said margarine and not butter, for whatever reason I do prefer margarine in this)
1/2 cup sugar
1/4 cup brown sugar
1/2 tsp vanilla
1/2 tsp maple extract 
1/8 cup warm milk (i just leave my milk out while I'm working on everything else and don't actually warm it)

For everything:
1/2 to 3/4 cup confectioners' sugar

For the dough:
Mix cream cheese and butter until smooth. 
Slowly add flour  until well blended. 
Shape into a 2 balls and chill overnight.

OK let's do this!
Preheat oven to 350.
Roll both dough balls out to 1/8" thick on a surface dusted with powdered sugar (you can use flour if you like but the powdered sugar makes it taste better) and square off.  

Roll any of the cast off from squaring the dough into 1" balls.

Cut one of the dough portions into 2" squares and place 1/2 tsp of preserves on an angle down the center. 
Overlap opposite corners and pinch together. 
Place on ungreased cookie sheets.

Bake for 10 to 12 minutes in the preheated oven. 
Let cool. 
Sprinkle with confectioner's sugar.


Place any 1" balls on cookie sheet and place a thumb print in each to flatten
Fill each thumb print with preserves

Bake for 10 to 12 minutes in the preheated oven. 
Let cool


Last but not least the nut log:
Mix together all ingredients as above and place in the center of the last portion of dough.
Slightly overlap the two sides and the flip the whole thing seam side down onto an ungreased pan.
Cut small slits in the top in a pattern so that your nut log is pretty ( I like to cut on an angle every 1/4 inch)

Bake for 12 to 15 minutes in the preheated oven. 
Let cool. 
Sprinkle with confectioner's sugar.


And there you have it my lovelies...Merry Christmas in July!

Special smooches to Sister Cid for once again inspiring my blog this week!!! 

Friday, July 26, 2013

But I want you to make it for me...

This is my bff, my sister from another mister, and the person I share a brain with...My darling sister Cid.  She is going to hit me with a pan the next time she sees me for using this picture but that's ok because I know she loves me even if I do put bad pictures of her on my blog.  A while back she had posted pictures of some chicken pot pies she made on her FB page and I wanted to fly down just to have a taste (yes they looked good enough to get me on a plane).  Today she is our guest in the kitchen sharing her secret.

Sister Cid's Easy Peasy Chicken Pot Pie  
Easy Chicken Pot Pie
What you need:
4 refrigerated pie crusts (9-inch)
1 can (10 3/4 ounces) Campbell's® Condensed Cream of Chicken Soup
1 can (10 3/4 ounces) Campbell's® Condensed Cream of Mushroom Soup 
1 16 oz package frozen mixed vegetables
12 oz pre cooked chicken breasts chicken (cubed in ½ pieces)

What to Do:

Heat oven to 425°F. 
Make pie crusts as directed on box for Two-Crust Pie using 9-inch glass pie pans.
In a bowl mix soup, frozen veggies and chicken. 
Spoon chicken mixture into crust-lined pans. 
Top with uncooked second crust; seal edge and flute. 
Cut slits in several places in top crust.
Bake 30 to 40 minutes or until crust is golden brown. 
During last 15 to 20 minutes of baking, cover crust edge with strips of foil to prevent excessive browning. 
Let stand 5 minutes before serving.


So a little thanks to my sister for always being there for me even through the horrible fashions of the 80's....
Much love and kisses... thanks for playing guest chef today!

P.S.  I still want you to make it for me 'cause ya know everything tastes better when you didn't have to cook it yourself!